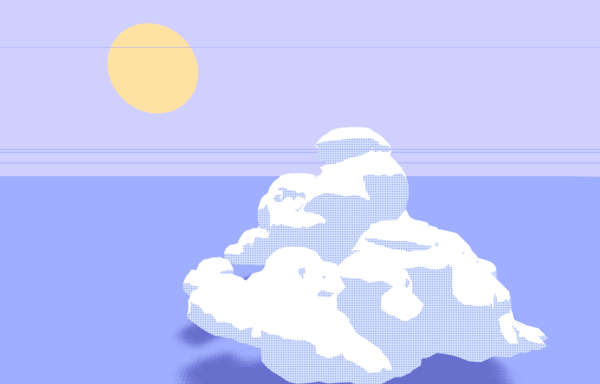
For as long as I can remember, I've always been fond of cumulonimbus clouds. They're like massive, beautiful mountains hanging in the sky. As I began to revisit my website and portfolio, I decided that I wanted to incorporate them somehow.
Although I'm primarily a React developer these days, I originally got into programming to pursue game development. From early on in my career, I was experimenting with 3D graphics and procedural generation. As my interest in web technologies began to develop, I found a common ground in ThreeJS, a popular web graphics framework.
Although I'm primarily a React developer these days, I originally got into programming to pursue game development. From early on in my career, I was experimenting with 3D graphics and procedural generation. As my interest in web technologies began to develop, I found a common ground in ThreeJS, a popular web graphics framework.
The further I got into frontend development, though, the less I was able to play around in 3D. Until recently, when I discovered the new react-three-fiber library from the makers of react-spring. I knew the time had come to update my website.
Creating clouds wouldn't be straightforward, though. I needed a way to generate a model mesh geometry algorithmically to resemble a cumulonimbus cloud, and do it on the web platform. While I'm familiar with the Marching Cubes algorithm for generating a smooth mesh from a voxel field, I'd still need to fill in the gaps of how to generate a cloud-shaped field, and do it in a browser.
Creating a Cloud
Creating a Cloud
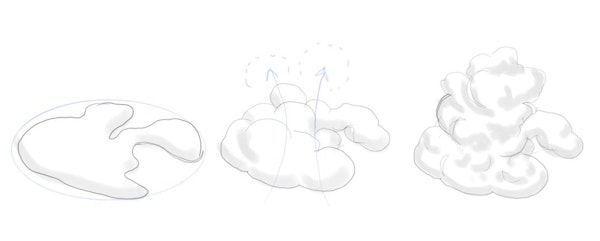
To create a cloud, I did some research on how clouds are formed. In a simplified sense, I realized I could visualize the creation of a cumulonimbus cloud as an amorphous blob which is 'inflated' upwards in a pseudo-random manner. Clouds sit on a 'shelf' of high-pressure air, so their bottoms are generally flat. The warm air rises, carrying moisture with it, and filling out into tall, rounded fractal shapes.
To design my cloud algorithm, I began with a 2D simplex noise pattern (masked to a circle) along the floor of my voxel field. This determines the basic shape of the 'formation' of clouds which will be generated, adding natural-looking variety to each cloud model.
Then, over several passes (the number of passes is configurable, but I found 3 works well), I iterate over each point in the field and determine how much I want to 'inflate' it. Inflation is basically the process of generating a new sphere centered on that point, then adding its voxel values into the existing field. 0-value voxels don't get inflated at all, and other values will be inflated based in part on their current value.
How much a point inflates is the magic of creating the right cloud shape. To simulate gravity, I made the inflation factor shrink exponentially the higher the point is on the Y axis. And to encourage a 'mound' shape, where the edges spread out thinly near the bottom and the center is voluminous and tall, I also boosted the inflation size when the point is near the center of the X-Z plane, regardless of Y value. This keeps the lower center area of the cloud robust, and increases the chance that a random point near the top of the center may be unusually inflated, creating some nice "Cumulonimbus Calvus" bubbling top structures.
How much a point inflates is the magic of creating the right cloud shape. To simulate gravity, I made the inflation factor shrink exponentially the higher the point is on the Y axis. And to encourage a 'mound' shape, where the edges spread out thinly near the bottom and the center is voluminous and tall, I also boosted the inflation size when the point is near the center of the X-Z plane, regardless of Y value. This keeps the lower center area of the cloud robust, and increases the chance that a random point near the top of the center may be unusually inflated, creating some nice "Cumulonimbus Calvus" bubbling top structures.
Finally, to reduce the appearance of being aligned to a grid, I add some random rotation to each cloud model as it's rendered.
To produce a geometry from the voxel field, I used the marching cubes algorithm. I adapted an example of the algorithm from a ThreeJS demo, which included the calculations needed to create smooth vector normals. The normals help the final model to look natural and rounded; you can hardly tell it's derived from a cubic grid.
Generating it in the Browser
The web can be a challenging platform to do procedural generation on, due to the single-threaded nature of JavaScript. However, there's a well-supported workaround to this: Web Workers.
Web Workers are essentially light threads for the browser. Shared memory support is limited and relatively new; in most cases you'll be serializing data to and from the worker thread. I decided this was sufficient for now.
Web Workers have never been easier to use than now, thanks to Webpack. I found the worker-plugin library, which makes spinning up a new worker as simple as including any other JS file. Plus, it seamlessly plugs my worker files into my TypeScript precompilation, so there's really no difference between writing a worker and writing part of the main bundle.
The marching cubes implementation I was adapting already stored all data in Float32Array buffers, which are serializable. So, most of my work was simply to migrate the logic into a worker environment, convert it to TypeScript to simplify my life, and set up my Cloud React component to trigger the generation of its geometry on mount and listen for the completed data to come back across the wire.
Final Touches
With the geometries generated, the algorithm tweaked, and React powering the scene, I could now focus on refining the visual appeal of the clouds with shaders.
ThreeJS had some great example shaders to start from. I opted for a toon-style cell shading, which accentuates the contours of the generated clouds without over-emphasizing the small irregularities in the geometry. I mixed together a few tricks from various toon shaders, including a stipled shadow effect.
One last thing remained: clouds just don't look right floating above the ground without proper shadow mapping. Unfortunately, ThreeJS' built-in shadow mapping just wouldn't cut it for me - I really wanted soft shadows on a solid-colored ground plane.
One last thing remained: clouds just don't look right floating above the ground without proper shadow mapping. Unfortunately, ThreeJS' built-in shadow mapping just wouldn't cut it for me - I really wanted soft shadows on a solid-colored ground plane.
First, I experimented with generating a custom shadow texture from the geometry itself and simply rendering it on a floating plane below the cloud using alpha mixing. However, I wasn't satisfied with the results, even after applying a basic blur to the resulting texture. The resolution was too low (because the resolution of the voxel field itself is only 64x64), and I couldn't think of any ideas to improve the overall look.
So, I dug into their built-in shaders and found the various included shader mixins they use to render shadows, and I pulled them into my own custom shader. I'm still a novice when it comes to shaders, but after some tweaking it came together.
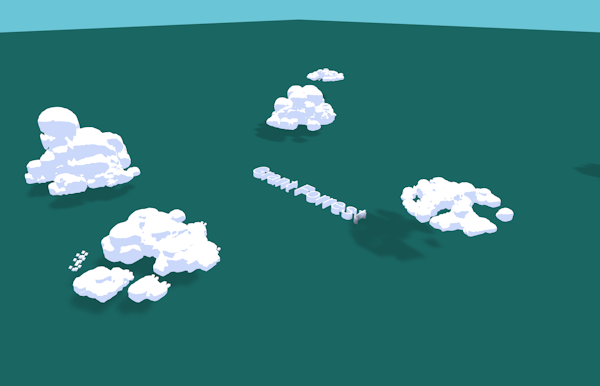
Creating a Scene
Now that the clouds themselves were ready, I needed to create an artistic composition which could serve as an eye-catching website. I happened to notice a retro-styled album cover featuring deep warm hues and geometric shapes, and this drove my initial "sunset" theme. Over time, I whipped up a new color scheme featuring periwinkle blues which I find more attractive.